![]()
![]()
![]()
![]()
![]()
![]()
![]()
![]()
Lace Pattern Archive
These patterns have all appeared in previous magazines.
|
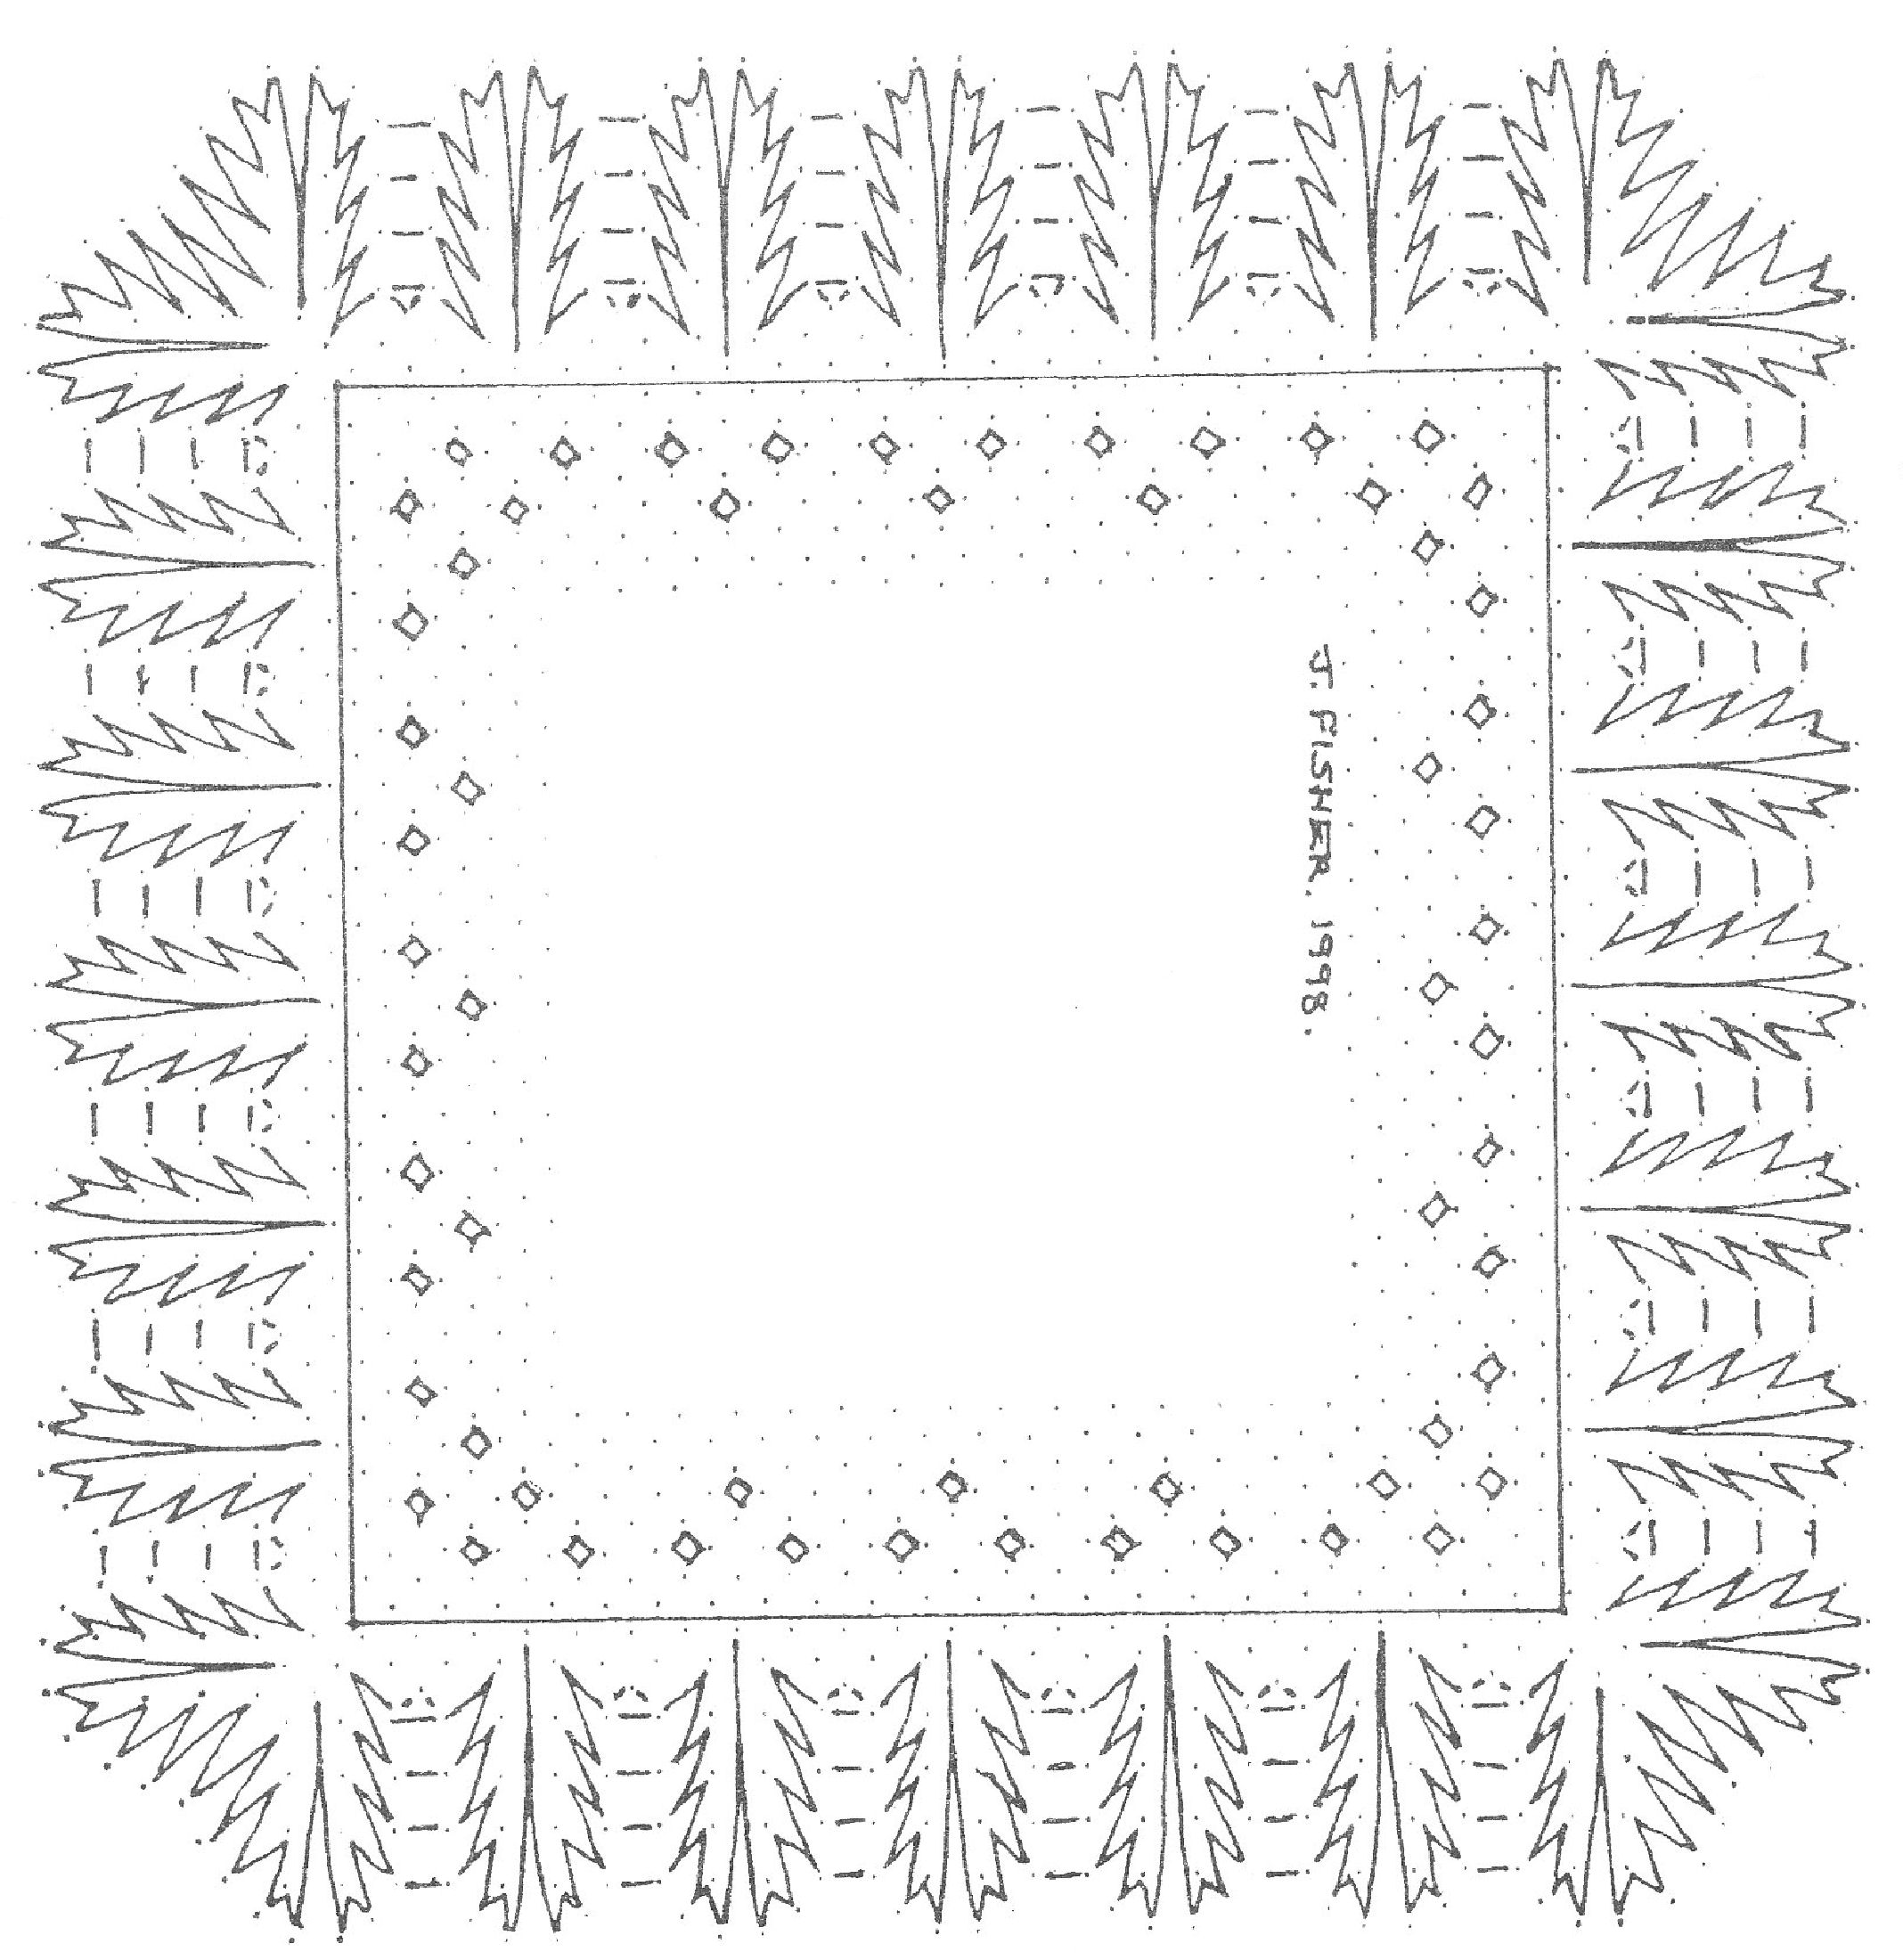
Torchon Mat by Janice Cole The pricking should be 15cm square. 37 pairs are needed. Thread used is equivalent to Retours 30. Work in a triangular fashion, start-line is corner to centre. It has been worked as a bed-cover for a doll’s house. Also reduced slightly and worked in 50 equivalent it could be a table-cloth for the same.
If you would like to download this pattern, click on the relevant pricking. This will open a new window with the pricking at full size (<100Kb). Right-click on it, and select 'Save picture as'. Give the pricking a name, click 'OK' and then close the window. We recommend that you then put the image into your word processor for ease. To get the pricking at the correct size make sure that the image size in your word processor is 15.5 centimetres high by 15.5 centimetres wide. If it isn't, you may be able to resize the image in your word processor. If you are not sure how to do this, then try the manual for your product or the on-line help. You can then print the pattern, preferably on a high quality print setting.
|
|
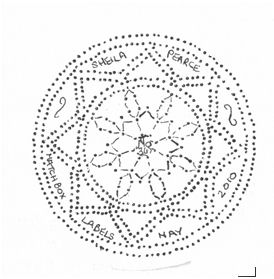
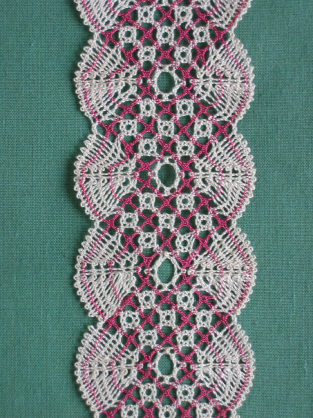
More Label Patterns by Sheila Pearce All are made using Mettler 60/2 and will fit a Framecraft 65mm trinket bowl lid or similar. They can also be attached to a bangle for decoration.
If you would like to download these patterns, click on the relevant pricking. This will open a new window with the pricking at full size (<100Kb). Right-click on it, and select 'Save picture as'. Give the pricking a name, click 'OK' and then close the window. We recommend that you then put the image into your word processor for ease. To get the pricking at the correct size make sure that the image size in your word processor is less than 7 centimetres high by 7 centimetres wide. If it isn't, you may be able to resize the image in your word processor. If you are not sure how to do this, then try the manual for your product or the on-line help. You can then print the pattern, preferably on a high quality print setting.
|


|
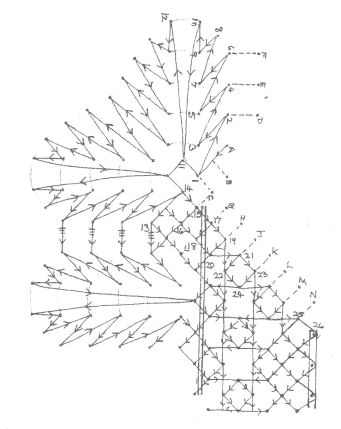
Lavender Sachet or Pin Cushion by Joyce Fisher 19 pairs of bobbins wound with DMC Refors d'Alsace 30's or similar thread are needed for the large square and 12 pairs for the inner square. Stitches used: Torchon ground (half stitch, pin, half stitch), Rose ground (cloth and twist without a pin, half stitch, pin, half stitch around the rose), torchon foot. Cloth and twist is used throughout the feathers and fan at the corners. Three twists are put on pairs between the feathers. Setting up; Begin at the comer fan. Letters on the diagram indicate support pins, numbers are permanent pins in order worked, except for pin A which has 2 pairs hung open on it, the left-hand pair of which becomes the weaver of the fan. Work the fan, adding and leaving out pairs as required, following the arrows and the number sequence until pin 13 is reached. Now lay in the pairs for the torchon- and rose-ground. The two passive pairs between pins 15 and 77 are worked in cloth stitch, with one twist on each side. At pin 26 a torchon foot is worked. The inner square: this is worked on the same pricking. The two passives form its outer edge, so pin 15 has one pair hung on it. Cloth stitch through the passives and ground stitch at pin 17. Cloth stitch back through the passives and put two twists on this pair before putting pin 18 under it. This gives a firm edge. To make up: lay the two pieces of lace on top of one another so that the passive strips coincide. Sew them together around this line. Make a pin cushion or lavender sachet 3/4 inches square and insert it between the two layers of lace. The feathers form a frill around the edge.
If you would like to download this pattern, click on the pricking. This will open a new window with the pricking at full size (590Kb). Right-click on it, and select 'Save picture as'. Give the pricking a name, click 'OK' and then close the window. We recommend that you then put the image into your word processor for ease. To get the pricking at the correct size make sure that the image size in your word processor is 6 centimetres high by 5.8 centimetres wide. If it isn't, you may be able to resize the image in your word processor. If you are not sure how to do this, then try the manual for your product or the on-line help. You can then print the pattern, preferably on a high quality print setting.
|

|
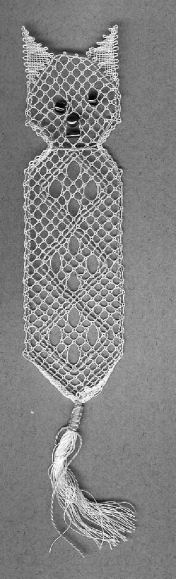
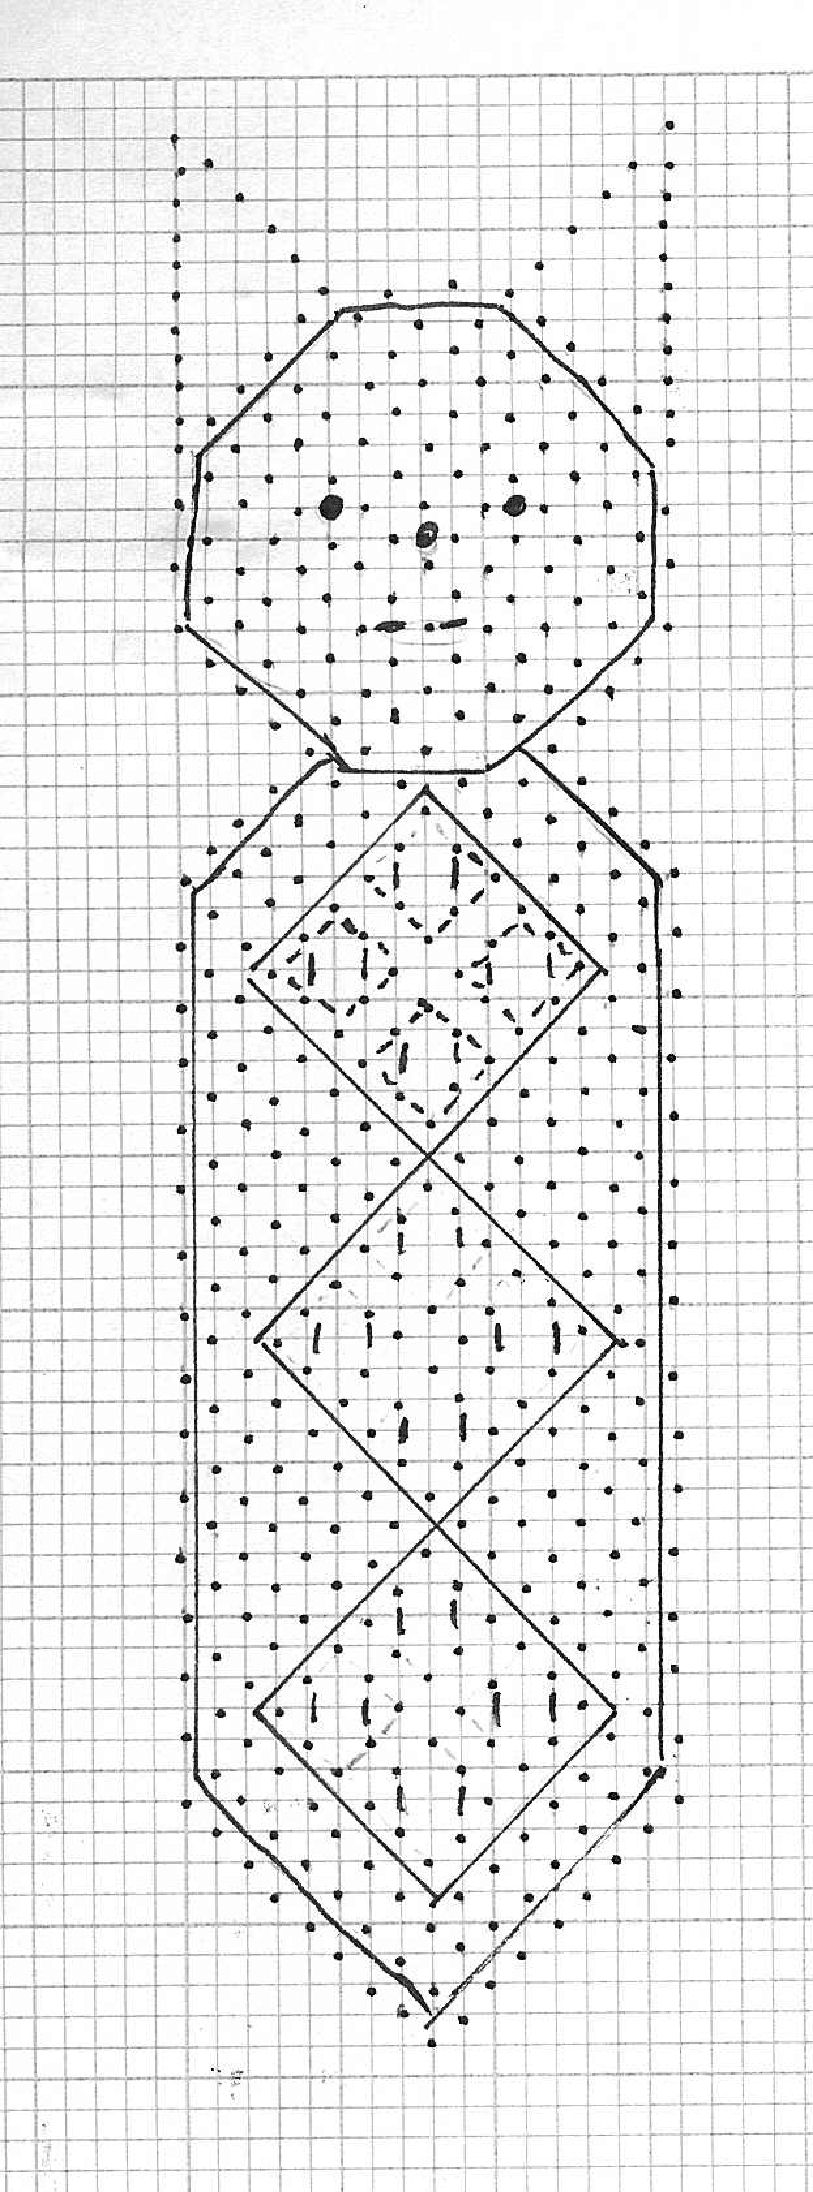
Cat Bookmark Designed by Sybil Howell This was designed by Sybil for her granddaughter who wanted a simple one to do. Thread; Sylko Gimp; Perlé 8 or 12 Bobbins; 18 pairs + 2 gimp pairs The ground stitch is half-stitch; pin; half-stitch; twist. The honeycomb could be changed to roseground or a 4 legged spider. The eyes and nose can be seed beads or tallies. For the mouth I just used two bugle beads. All the threads are worked down towards the point and plaited to form the tail.
If you would like to download this pattern, click on the pricking. This will open a new window with the pricking at full size (378Kb). Right-click on it, and select 'Save picture as'. Give the pricking a name, click 'OK' and then close the window. We recommend that you then put the image into your word processor for ease. To get the pricking at the correct size make sure that the image size in your word processor is 14.26 centimetres high by 5.27 centimetres wide. If it isn't, you may be able to resize the image in your word processor. If you are not sure how to do this, then try the manual for your product or the on-line help. You can then print the pattern, preferably on a high quality print setting.
|
|
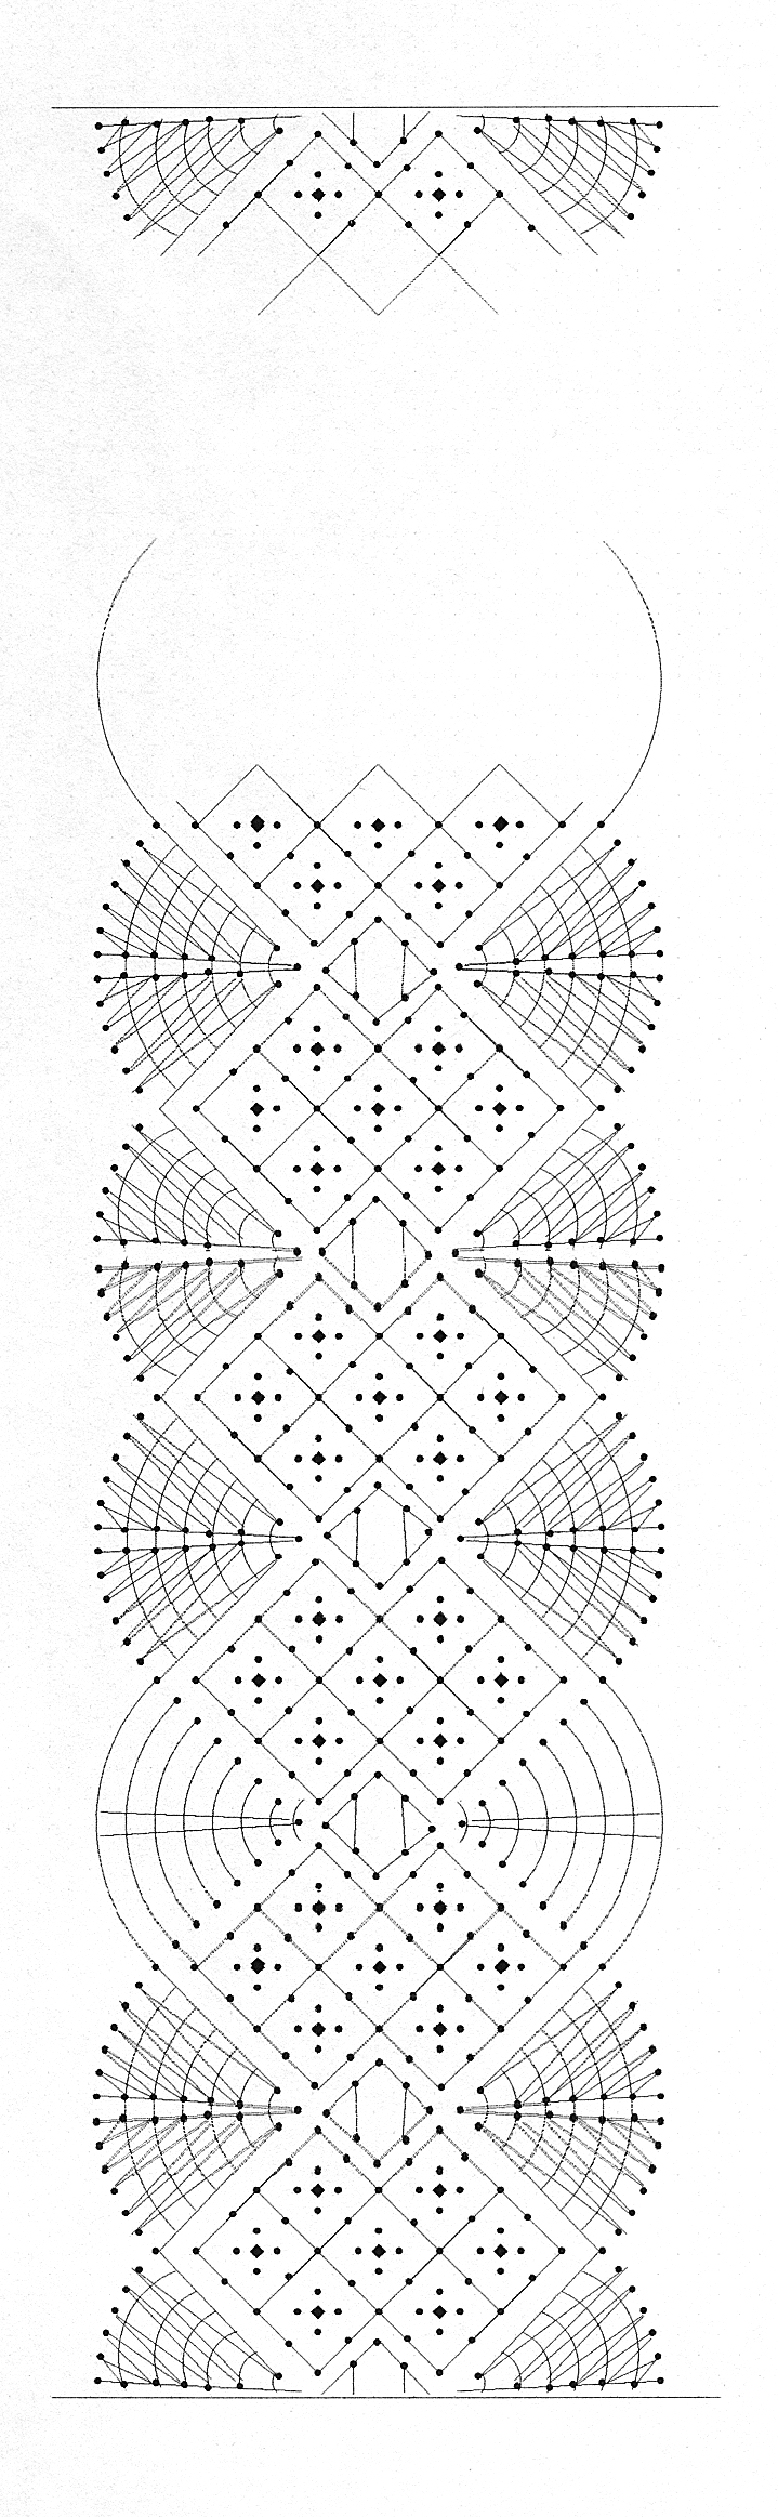
Designed on Lace2000 and worked by Maureen Barber. The bobbins for the braids (16 pairs) were wound with 4 arms lengths of Rayon Madeira no 40 colour 1119. The rest of the bobbins (12 pairs) were wound with 8 arms lengths of Filatu de Cantù 40. Roseground with braids, was taken from The Book of Bobbin Lace Stitches Bridget M Cook & Geraldine Stott. Batsford 2002 ISBN 0 7134 723 2 (roseground 16 p80). Honeycomb was worked whole stitch pin whole stitch twist.
To get a copy of the pattern to work, click the pricking. This will open a new window with the pricking at full size (1284Kb). Right-click on it, and select 'Save picture as'. Give the pricking a name, click 'OK' and then close the window. We recommend that you then put the image into your word processor for ease. To get the pricking at the correct size make sure that the image size in your word processor is 19.7 centimetres wide by 6.1 centimetres high. If it isn't, you may be able to resize the image in your word processor. If you are not sure how to do this, then try the manual for your product or the on-line help. You can then print the pattern, preferably on a high quality print setting.
|
|
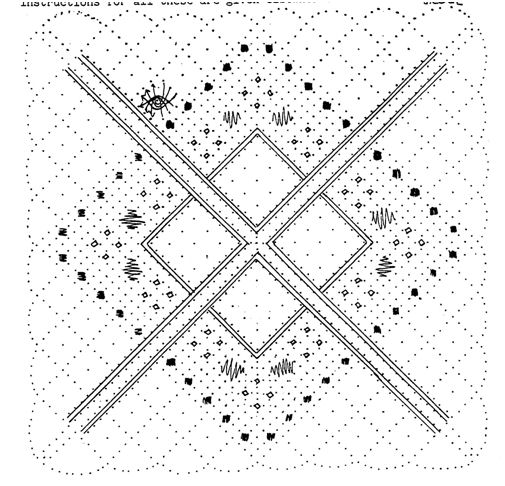
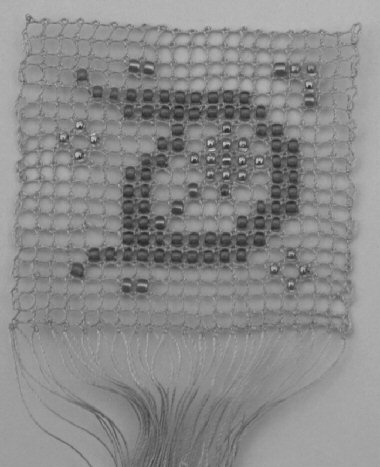
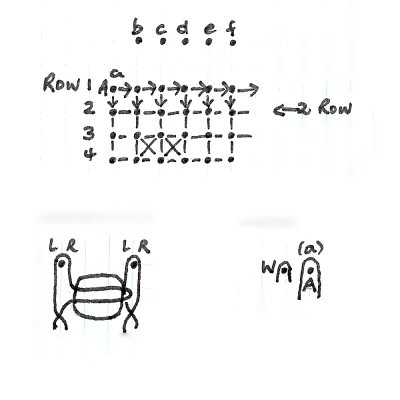
Although I am firstly a lacemaker I am also a beadworker and interested in various ways of using beads. There is an Australian magazine which publishes cross stitch patterns that have a dual purpose, either as traditional cross stitch or with beads, on canvas. I have also experimented with beads stitched on to pre-punched card representing canvas. I was pleased to be shown, by a friend who had attended a course, some projects using, instead of a loom, lace to make warp and weft threads with beads creating the designs. Any cross stitch patterns are suitable and graph paper is ideal for charting new one. The following is my interpretation. Preparation 1. Begin by adapting or designing your pattern by charting it on inch graph paper -this works well if using size 11 seed beads. Allow extra rows top, bottom and both sides giving a border which can be covered if the lace is to be framed. 2. Ink in all the pinholes and mark the squares matching the colours to the beads (see X in diagram) Colour is better than symbols which can be confusing in a small space. 3. Wind pairs of bobbins - one pair for each pinhole along the top of the pricking plus one pair for workers. I have found a coloured thread (usually DMC d:Alsace 30) more pleasing than white.
4. Don't use too small a pillow as working is easier if bobblns can be spread out. Prick the pattern before working. It can be useful to have a separate picture of the design.
Method
Refer to the diagram. Start on the left-hand side of the pricking. Place pin in A and hang on passive pair (a). With workers on support pin W (see fig I) work half stitch and twist. The workers are now ready to work with pair (b) hanging on support pin (b). Work half stitch, pin, half stitch and twist, repeat with pairs (c); (d). etc. to the end of the row. Remember to remove all support .pins. To begin row 2 * place edge pin in pinhole between last pair and workers and work cloth stitch and two twists. For the rest of the row work half stitch, pin, half stitch and twist. NB all first (edge} pinholes to be worked as *.
When coloured square is reached take twists off the pairs hanging down either side (see fig 2). Pick up the chosen bead on a very fine crochet hook, pull RIGHT hand thread from left hand pair through the bead. Discard crochet hook. Insert LEFT hand thread from right hand pair through loop and tension both pairs. Place in beads for the rest of the row and remember to twist the passives before working to the end.
When the final row is complete tie off pairs and leave work to set.
To illustrate this article I designed my initial "D". As with all designs the first piece (which this is) can show where improvements are needed. In this case I think a few more beads in the background. It is not necessary to fill all the squares with beads as spaces make the design stand out. I found a small strip of foam mat placed on the pillow made picking up the beads much easier. At the moment I am not happy with the arrangement at the sides of the design - extra pinholes are not satisfactory either. Perhaps a torchon footside would be neater. I do hope some of you will try working some patterns.
To get a copy of the pattern to work, click the pricking.
This will open a new window with the pricking at full size (100Kb). Right-click
on it, and select 'Save picture as'. Give the pricking a name, click 'OK' and
then close the window. We recommend that you then put the image into your word
processor for ease. To get the pricking at the correct size make sure that the
image size in your word processor is approximately 6 centimetres wide by 6.4 centimetres high. If it isn't, you may be able to resize the image in your word processor. If you are not
sure how to do this, then try the manual for your product or the on-line help.
You can then print the pattern, preferably on a high quality print
setting. |
||||

|
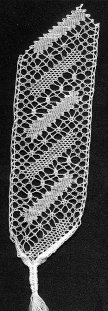
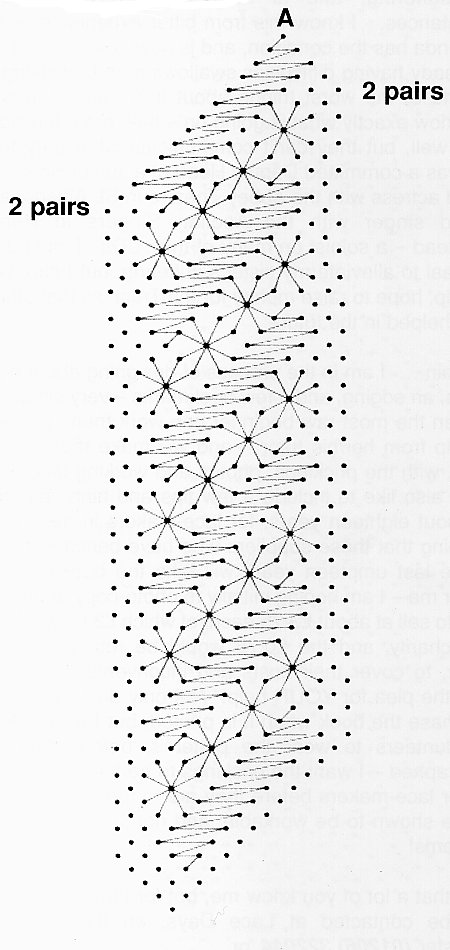
This bookmark is an adaptation of an insertion by Robin Lewis-Wild. It is worked using 21 pairs of fil a dentelle. Start a point A with 2 pairs and add 2 pairs at each footside Stitches used - torchon ground, cloth stitch trail, half stitch spider, half stitch trail and cloth stitch spiders.
To get a copy of the pattern to work, click the pricking. This will open a new window with the pricking at full size (81Kb). Right-click on it, and select 'Save picture as'. Give the pricking a name, click 'OK' and then close the window. We recommend that you then put the image into your word processor for ease. To get the pricking at the correct size make sure that the image size in your word processor is 16.7 centimetres high by 7.9 centimetres wide. If it isn't, you may be able to resize the image in your word processor. If you are not sure how to do this, then try the manual for your product or the on-line help. You can then print the pattern, preferably on a high quality print setting.
|